Showing posts with label Lorac PRO palette. Show all posts

August 6, 2014

Tutorial: Golden UD Smokey Eye

Hello lovelies! After weeks of searching and really kind of being convinced that I was never going to see it again, I found my Urban Decay Vice Palette (original)! I'm thrilled, it's going to be so nice having all these fun colors to play with and produce some more interesting posts for you guys. Because let's be real, I love my Naked, Lorac PRO, and all of those other palettes to pieces but there's only so many looks I can do with neutral colors. So today I'm diving into a step-by-step of a look that's certainly out of my comfort zone, gold!


If you're interested to know how I got this look, keep reading!

Step one: I primed my eyelids all the way from lash line to brow bone.

Step two: I opened up my Urban Decay The Vice palette and dipped a dome-shaped blending brush (mine was quite large, and synthetic) into the color Laced, (which is a dusty-nude pink) and blended it across my entire crease. This is just being used as my transition color and I didn't even really deposit enough color to bother taking a picture of it, just enough to make blending easier and more seamless.

Step three: I then dipped that same brush into the color Muse (a beautiful cocoa-brown with golden shimmer, it leans slightly cool) and dabbed it into my outter "V" and gently blended it into my crease making sure to steer clear of the inner 1/3 and concentrating the most color in the outter 1/3.

Note; I used tape to get a clean line to get the cat-eye effect that I desired but it's completely optional.

Step three: I then took the color Sable from my Lorac PRO palette one a flat-fluffy brush and used that to buff out the crease a little more and just add a bit of warmth and depth to my outter corner.


Step four: then I took my flat, dense, shader brush that came with my UD Naked palette in the color Blitz from The Vice palette (a yellow/gold color that's very matallic, not chunky glitter) and ever-so-gingerly patted that onto the naked part of my lid. I did this a couple times to get the desired effect and make sure it was deposited in the right spots.


Step five: after making sure I had that color right where I wanted it, I went back in with my fluffy flat brush (not wiped off so there's still a hint of left over Sable on it) and verrry gently blended just the edges of Blitz so it doesn't look so blunt, going for a more soft and "air brushed" effect. I also went ahead and added my tear duct/inner-most lid highlight which is the color Nude from the Lorac PRO palette and my browbone highlight which is Anonomous from The Vice palette.


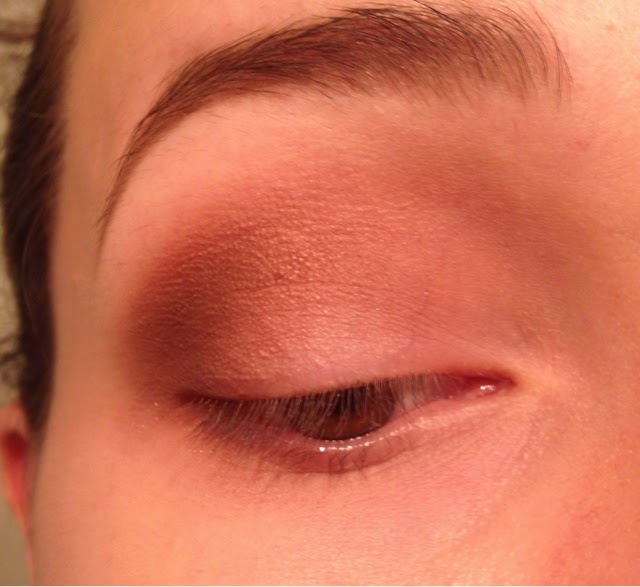
Finally I slapped on some mascara, eyeliner, concealer, and blush. Here is the completed look;


I hope you all enjoyed this look and are just as excited as I am to do many, many more looks and tutorials using outside-the-box colors. Thanks for reading!:)

July 31, 2014

EOTD & the one-month-countdown!

Good morning to all! It's official as of yesterday we have less than a month until our baby girl makes her appearance, we couldn't be more excited!:) I have my Doctors appointment tomorrow where I will be checked to see if I'm dilated or effaced at all (which I'm pretty sure I am) and get the doctors thoughts on how close she is to coming. I can't wait! 

Anyways, on to my Eye Of The Day yesterday;


Although yesterday was National Lipstick Day I went without, lipstick just isn't my cup of tea. We were just running to the store and hanging around so I figured I would test out a "real" brown smoky eye ("real" meaning that I added the shadow on the bottom lash line that I fear oh-so-much). It wasn't too harsh or crazy, all matte to be daytime appropriate, and all from my beloved Lorac PRO original palette. All in all, I really love how it turned out, I felt it was well blended, subtle but still defining my eyes and giving off some drama. What do you guys think? This is a slightly more dramatic version if my go-to daily look, what's your favorite daily look?

Products used: Elf Eyelid Primer, Lorac PRO palette (shades used; cream, taupe, sable, espresso, nude, and white), Rimmel Waterproof Gel eyeliner in Black, and Benefit They're Real! mascara.

Keep your eyes peeled for a reveal of my brand-new positively dreamt diaper bag and first impression! Thank you so much for reading, hope you'll come back soon.:)

July 23, 2014

Summer sunset smokey eye tutorial

Hello again all!

Today I planned out a nice little tutorial for you all. This is by far the most complicated look I've done since startin this blog and I'm pretty proud of making it a tutorial. Keep reading to learn more, enjoy!

First I did my eyebrows, and primed my lids with my Elf eyelid primer, and let it set for 10 minutes.

Secondly, I took a domed, fluffy, blending brush (mines the Real Techniques Round Crease Brush) and dipped it into Mauve from my Lorac PRO Palette and mixed in just a hiiiint of Taupe for my transition shade. I lay the transition shade first to make blending easier so it doesn't muddy up the lid colors, which I'll be adding later.

*note I apologize these photos are pretty yellow-toned, I could not get my camera to adjust properly.:(

Then I took Sable from the same palette on a flat fluffy brush and blended that 3/4 of the way into my crease. I'm going to steer clear of that inner-most 1/4 of my crease so my pop of gold will show up ideally.


Then I look Garnet on a flat shader brush and kind of "stamped" it on my outter V to (A) avoid fallout as much as possible and (B) to get the right shape on both eyes. No one likes it when one eye has a night outter V shape and the other is more... Uh... Oval-y.


Then I just took the flat fluffy brush previously mentions and blended that out so there weren't any harsh edges.


After that was nicely blended I took Hustle from my Naked 1 palette on a (clean) fluffy flat blending brush and used that to just deepen my crease a bit for some more definition.


I then took Lt. Gold from my Lorac PRO palette and put that on my inner crease (remember that 1/4 we left bare?) and brought down a little onto my inner-most lid.

*gosh, sorry that bottom photo is so darn blurry! Today is apparently not my day.

Finally I took Urban Decay Half Baked and a flat shader brush that's a bit more dense and dabbed it onto the middle of my lid (the inner-half specifically).


Finally I added some eyeliner (L'oreal Super Slim liquid eyeliner, in Black) and mascara (Kat Von D mascara I can't recall the specific name and it's nowhere to be found on the packaging) to complete the look.


In natural lighting, to get a truer feel for what it looks like outside of my very yellow lighting.


Thank you all so much for reading and bearing with me lately. I hope you all are enjoying summer and taking advantage of these gorgeous days, come back and read again, I'd really appreciate it!:)

July 8, 2014

EOTD and my Lazy Tuesday

Today we went to Dairy Queen, ran some errands, I FaceTimed my mom, and watched The Fault in our Stars. It was a really fun day! I've felt kind of off all day and the baby wasn't moving a whole lot so I kind of took it easy. Thankfully we got her to move around a healthy amount to make sure she's okay and so now we're all feeling much less worried.

Today I used my Lorac PRO Palette (original) for a basic, easy, but pretty and soft eye look with a bold hot pink lip! Logan is convinced my lips look red, what do you think?


Please be kind and ignore my atrocious under-eye bags, I've been positively pooped lately. As you can see I did my eyebrows today, which I will be doing a tutorial on soon, even though I really don't do anything special.

Products used: Lorac PRO palette (Nude, Lt. Pink, Mauve, & Taupe), Maybelline Color Tattoo in Barely Branded, Elf eyelid primer, Maybelline Pumped Up! mascara, Covergirl 3-in-1 foundation, Rimmel ScandelEYES gel eyeliner in Black, and Milani eyebrow pencil.

Hope you all have had a wonderful beginning to your week and enjoyed your Tuesday! Please comment and tell me what types of posts you'd like to see me do (tutorials, basic looks, reviews, etc.) I'm open to all the options!

June 29, 2014

First post & easy everyday eye look!

:)Welcome all, I'm Shannon and this is my makeup blog. I've been passionate about makeup since I can remember and have tried a few times to start a makeup blog unsuccessfully but I'm committed to make it work this time! I hope you all will bear with me and come along for the ride:)

Alright! Now, on to this easy every day eye looks featuring an eyeliner that I just picked up the other day that I will certainly be reviewing soon and the Lorac PRO palette (original).

I've started off by priming my eyelid with Elf Eyelid Primer, and putting the Cream color from the Lorac PRO palette all over my lid to make blending and whatnot easier (and to correct any discoloration).


Next I'm going to take the Mauve color with a fluffy shader brush and softly define my crease, just to add a hint of definition. 


And really blend that all into your crease, (but don't bring it above the crease!) making sure it's really subtle and soft.


Next I'm going to take the shade Sable with a fluffy shader brush and concentrate blending that on the outer "V" area of my lid.


Ugh, my eyelids are so vein-y!:( sorry about that. Anywho, now I'm going to take Nude on a flat brush and put that on the middle/inner part of my lid and White on the brow bone. This will really brighten the eye area and make you look much more awake. Along with pulling the whole look together and making it look more polished.


Not as noticable in a photo as it is looking in the mirror but hey, I tried my best to capture it. Now I'm going to line my eyes with my Rimmel London gel waterproof eyeliner in Brown (002).


You don't have to flick out a wing like I did, but I have a weird eye shape and I just prefer it personally! Now to just add mascara and conceal and you're done.:)

Here's the finished look;


(Natural lighting)

(Yellow-lightbulb lighting)

Thanks for bearing with me, guys! I really hope you liked the post and will come back to see what's more to come. Thank for reading, have a great lazy Sunday!