Showing posts with label step by step. Show all posts

July 23, 2014

Summer sunset smokey eye tutorial

Hello again all!

Today I planned out a nice little tutorial for you all. This is by far the most complicated look I've done since startin this blog and I'm pretty proud of making it a tutorial. Keep reading to learn more, enjoy!

First I did my eyebrows, and primed my lids with my Elf eyelid primer, and let it set for 10 minutes.

Secondly, I took a domed, fluffy, blending brush (mines the Real Techniques Round Crease Brush) and dipped it into Mauve from my Lorac PRO Palette and mixed in just a hiiiint of Taupe for my transition shade. I lay the transition shade first to make blending easier so it doesn't muddy up the lid colors, which I'll be adding later.

*note I apologize these photos are pretty yellow-toned, I could not get my camera to adjust properly.:(

Then I took Sable from the same palette on a flat fluffy brush and blended that 3/4 of the way into my crease. I'm going to steer clear of that inner-most 1/4 of my crease so my pop of gold will show up ideally.


Then I look Garnet on a flat shader brush and kind of "stamped" it on my outter V to (A) avoid fallout as much as possible and (B) to get the right shape on both eyes. No one likes it when one eye has a night outter V shape and the other is more... Uh... Oval-y.


Then I just took the flat fluffy brush previously mentions and blended that out so there weren't any harsh edges.


After that was nicely blended I took Hustle from my Naked 1 palette on a (clean) fluffy flat blending brush and used that to just deepen my crease a bit for some more definition.


I then took Lt. Gold from my Lorac PRO palette and put that on my inner crease (remember that 1/4 we left bare?) and brought down a little onto my inner-most lid.

*gosh, sorry that bottom photo is so darn blurry! Today is apparently not my day.

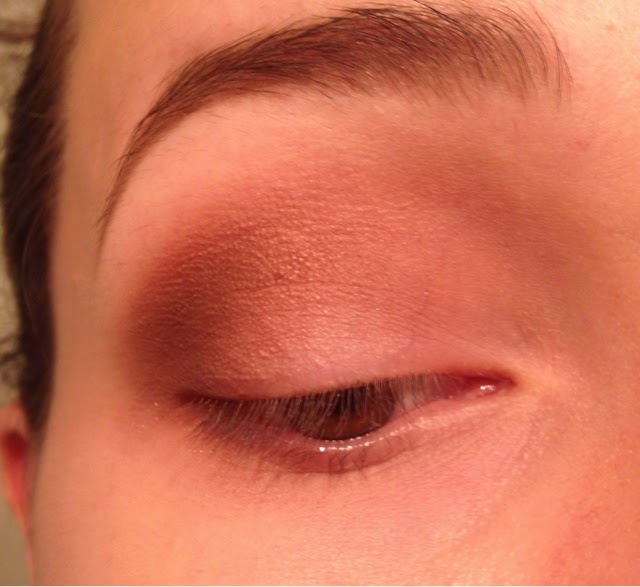
Finally I took Urban Decay Half Baked and a flat shader brush that's a bit more dense and dabbed it onto the middle of my lid (the inner-half specifically).


Finally I added some eyeliner (L'oreal Super Slim liquid eyeliner, in Black) and mascara (Kat Von D mascara I can't recall the specific name and it's nowhere to be found on the packaging) to complete the look.


In natural lighting, to get a truer feel for what it looks like outside of my very yellow lighting.


Thank you all so much for reading and bearing with me lately. I hope you all are enjoying summer and taking advantage of these gorgeous days, come back and read again, I'd really appreciate it!:)

June 29, 2014

First post & easy everyday eye look!

:)Welcome all, I'm Shannon and this is my makeup blog. I've been passionate about makeup since I can remember and have tried a few times to start a makeup blog unsuccessfully but I'm committed to make it work this time! I hope you all will bear with me and come along for the ride:)

Alright! Now, on to this easy every day eye looks featuring an eyeliner that I just picked up the other day that I will certainly be reviewing soon and the Lorac PRO palette (original).

I've started off by priming my eyelid with Elf Eyelid Primer, and putting the Cream color from the Lorac PRO palette all over my lid to make blending and whatnot easier (and to correct any discoloration).


Next I'm going to take the Mauve color with a fluffy shader brush and softly define my crease, just to add a hint of definition. 


And really blend that all into your crease, (but don't bring it above the crease!) making sure it's really subtle and soft.


Next I'm going to take the shade Sable with a fluffy shader brush and concentrate blending that on the outer "V" area of my lid.


Ugh, my eyelids are so vein-y!:( sorry about that. Anywho, now I'm going to take Nude on a flat brush and put that on the middle/inner part of my lid and White on the brow bone. This will really brighten the eye area and make you look much more awake. Along with pulling the whole look together and making it look more polished.


Not as noticable in a photo as it is looking in the mirror but hey, I tried my best to capture it. Now I'm going to line my eyes with my Rimmel London gel waterproof eyeliner in Brown (002).


You don't have to flick out a wing like I did, but I have a weird eye shape and I just prefer it personally! Now to just add mascara and conceal and you're done.:)

Here's the finished look;


(Natural lighting)

(Yellow-lightbulb lighting)

Thanks for bearing with me, guys! I really hope you liked the post and will come back to see what's more to come. Thank for reading, have a great lazy Sunday!